Help center · Tutorial · 7 steps
How to track a research project budget: budget lines, spending, cost share, and the indirect rate
- About 15 minutes
- Free plan and up
- Checked in the app on
To track a research project budget on Helikon, set up the budget on the project's Budget tab, with a line for each cost category and the indirect rate. Then record spending as it happens, or import it from a spreadsheet. The tab shows the total, what's been spent, what's left, and the cost share against what was committed. Only the project owner and admins see the figures. It works on every plan.
Before you start: you need a project, and you need to be its owner or an admin. Everyone else on the project sees the Budget tab with Budget: visible to project managers and no figures. The Budget range on the project form is separate: it's free text that members can read, while the Budget tab holds the actual budget.
Step 1Set up the budget lines
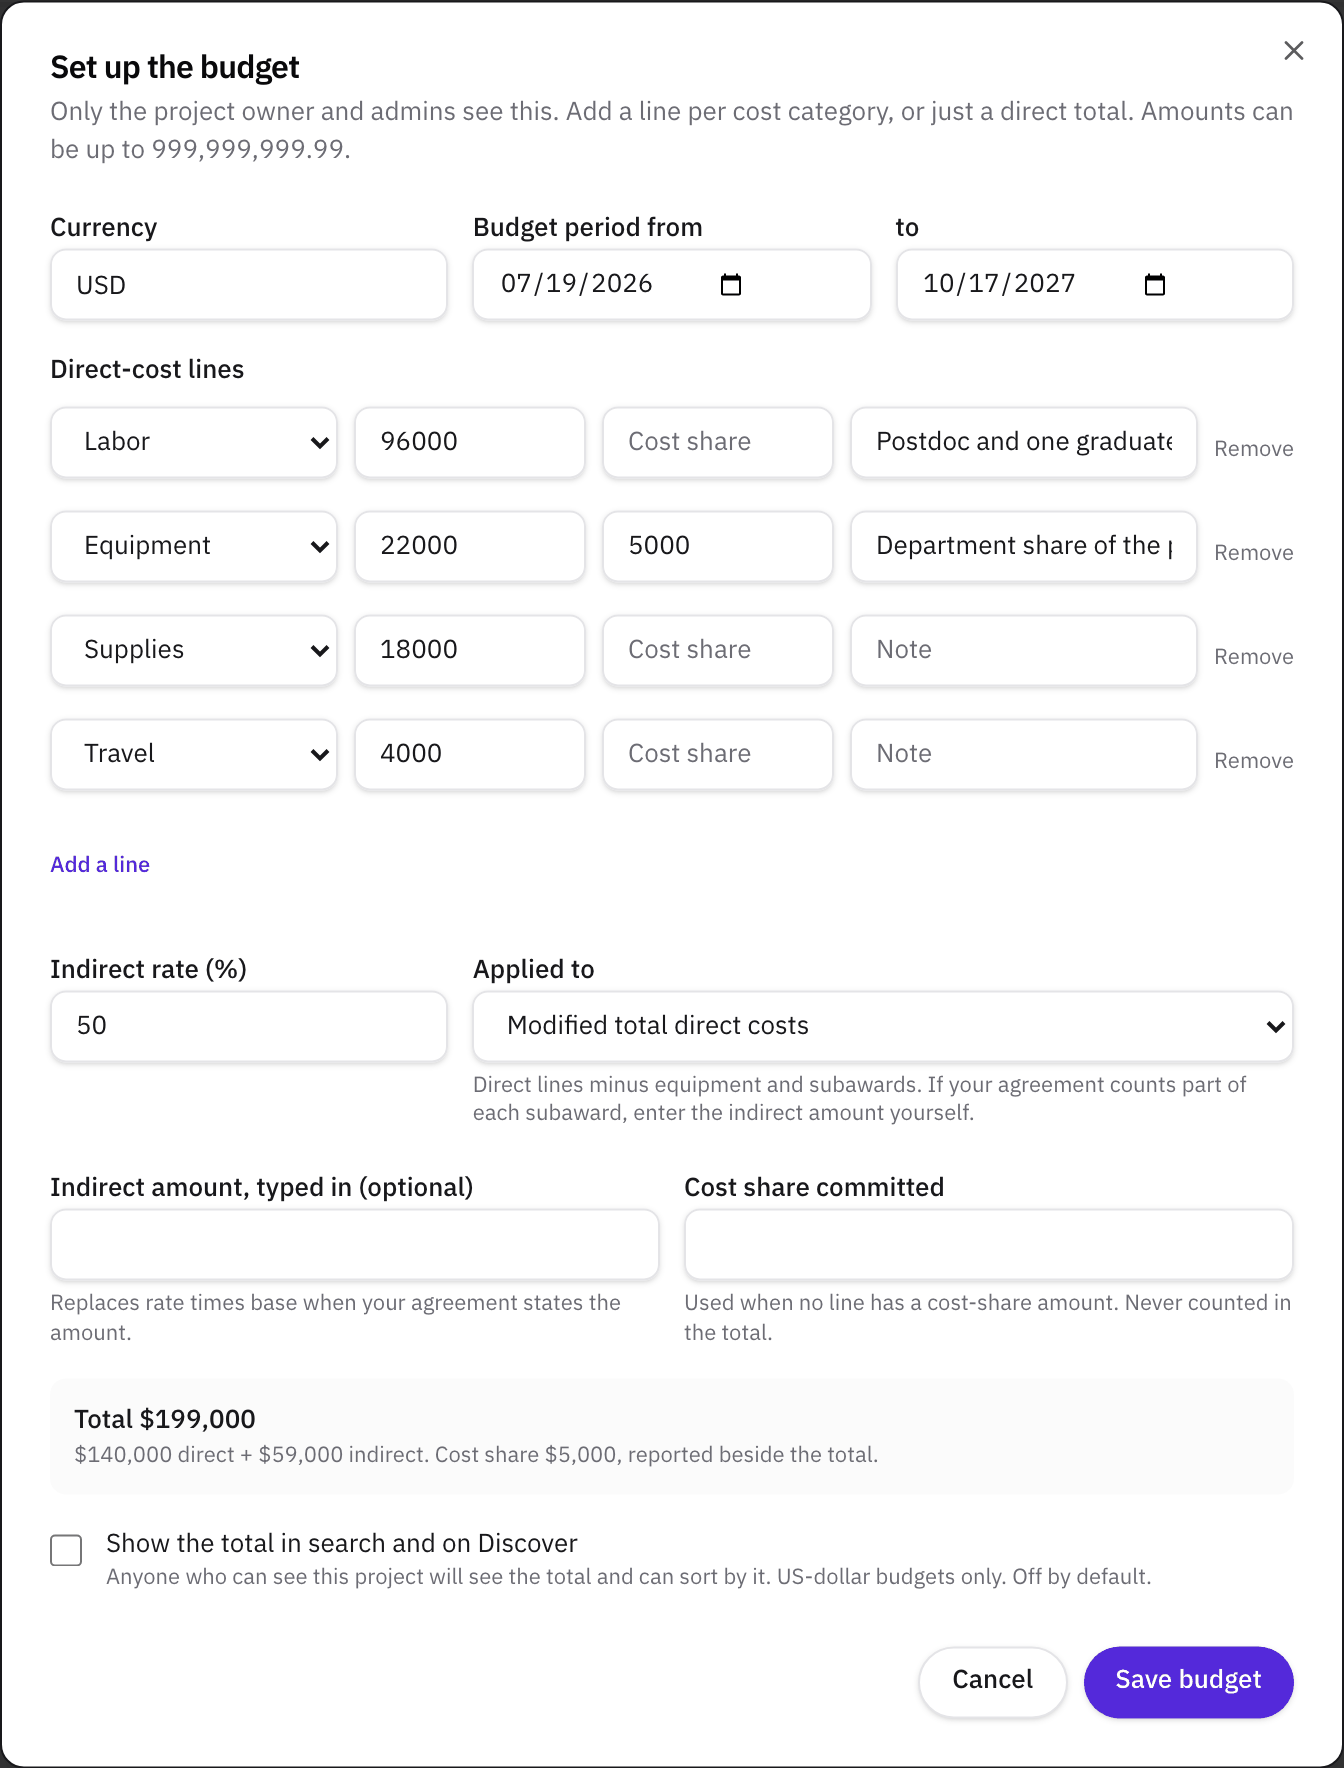
Open the project's Budget tab and click Set up the budget. The dialog asks for:
- Currency: a three-letter code, US dollars unless you change it.
- Budget period from and to: filled in with the project's dates, which you can change.
- Direct-cost lines: click Add a line for each one and choose its category: Labor, Equipment, Supplies, Travel, Subaward, or Other. Each line takes an amount, an optional cost-share amount, and a note, such as "Postdoc and one graduate student". A budget holds up to 100 lines.
With no lines, enter a single Direct total instead. Amounts go up to 999,999,999.99.
Step 2Add the indirect rate
Below the lines, enter the Indirect rate (%) and choose what it's Applied to:
- Total direct costs: every direct line.
- Modified total direct costs: the direct lines minus equipment and subawards. If your agreement counts part of each subaward, type the indirect amount in yourself.
- Labor only: the labor lines only.
If the agreement states the indirect amount instead of a rate, enter it in Indirect amount, typed in (optional), which replaces rate times base. The dialog shows the total as you go, direct plus indirect, with the cost share reported beside it. Click Save budget.
Our article Why do universities charge companies indirect costs, and is the F&A rate negotiable? explains where the rate comes from and what a sponsor can ask about it.
Step 3Record the cost share
Cost share is the part of the project's cost that the sponsor doesn't pay, because one side contributes it. Enter it on each line, in the line's cost-share amount, or as one figure in Cost share committed, which is used when no line has a cost-share amount. Cost share is never added to the total. The tab reports it beside the total, as what's been spent of what was committed.
Translation Box: "cost share"
On the academic side: the institution's own contribution to a sponsored project, such as part of a salary or a piece of equipment. The sponsored programs office has to be able to document it later.
On the industry side: in a company-sponsored agreement, what the university adds on top of the sponsor's funding. In a government-funded collaboration, it can be the company's own contribution, in cash or in kind.
On a federal award, the agency must accept cost sharing, including cash and third-party in-kind contributions, when the funds meet a list of tests. The first is that they "are verifiable in the recipient's or subrecipient's records" (2 CFR 200.306(b)(1)). The same section says voluntary committed cost sharing isn't expected under federal research grants. Marking cost-share spending as it happens (step 4) shows both sides what's been contributed so far. Your institution's financial system stays the official record.
Step 4Record spending as it happens
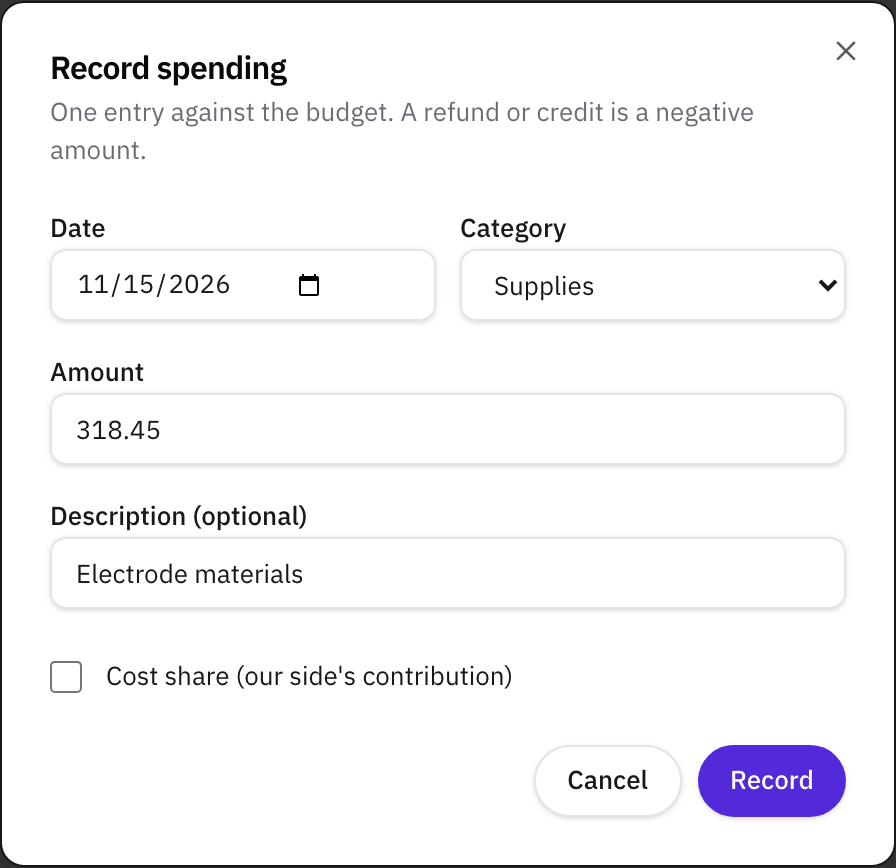
Under Spending, click Record spending. Enter the Date, the Category (the budget's categories plus Indirect (F&A)), the Amount, and a Description (optional). A refund or credit is a negative amount. Tick Cost share (our side's contribution) for spending that counts toward the cost share, and click Record.
The list shows each entry with its date and category, and marks the ones that are cost share or were imported. Remove takes an entry off. A project holds up to 5,000 entries.
Step 5Import spending from a spreadsheet
To bring in a ledger, click Import a spreadsheet. Save the ledger as a CSV file with columns for the date, the category, and the amount, plus cost share and a description if your ledger has them. Download the CSV template gives you the headings. Your own export usually works too, because Helikon recognizes common headings, such as "Posting date", "Expense type", and "Memo", and common category names, such as "Salaries", "Materials", and "Overhead". Dates can be written 2026-09-30 or 9/30/2026. A file can hold up to 2,000 rows.
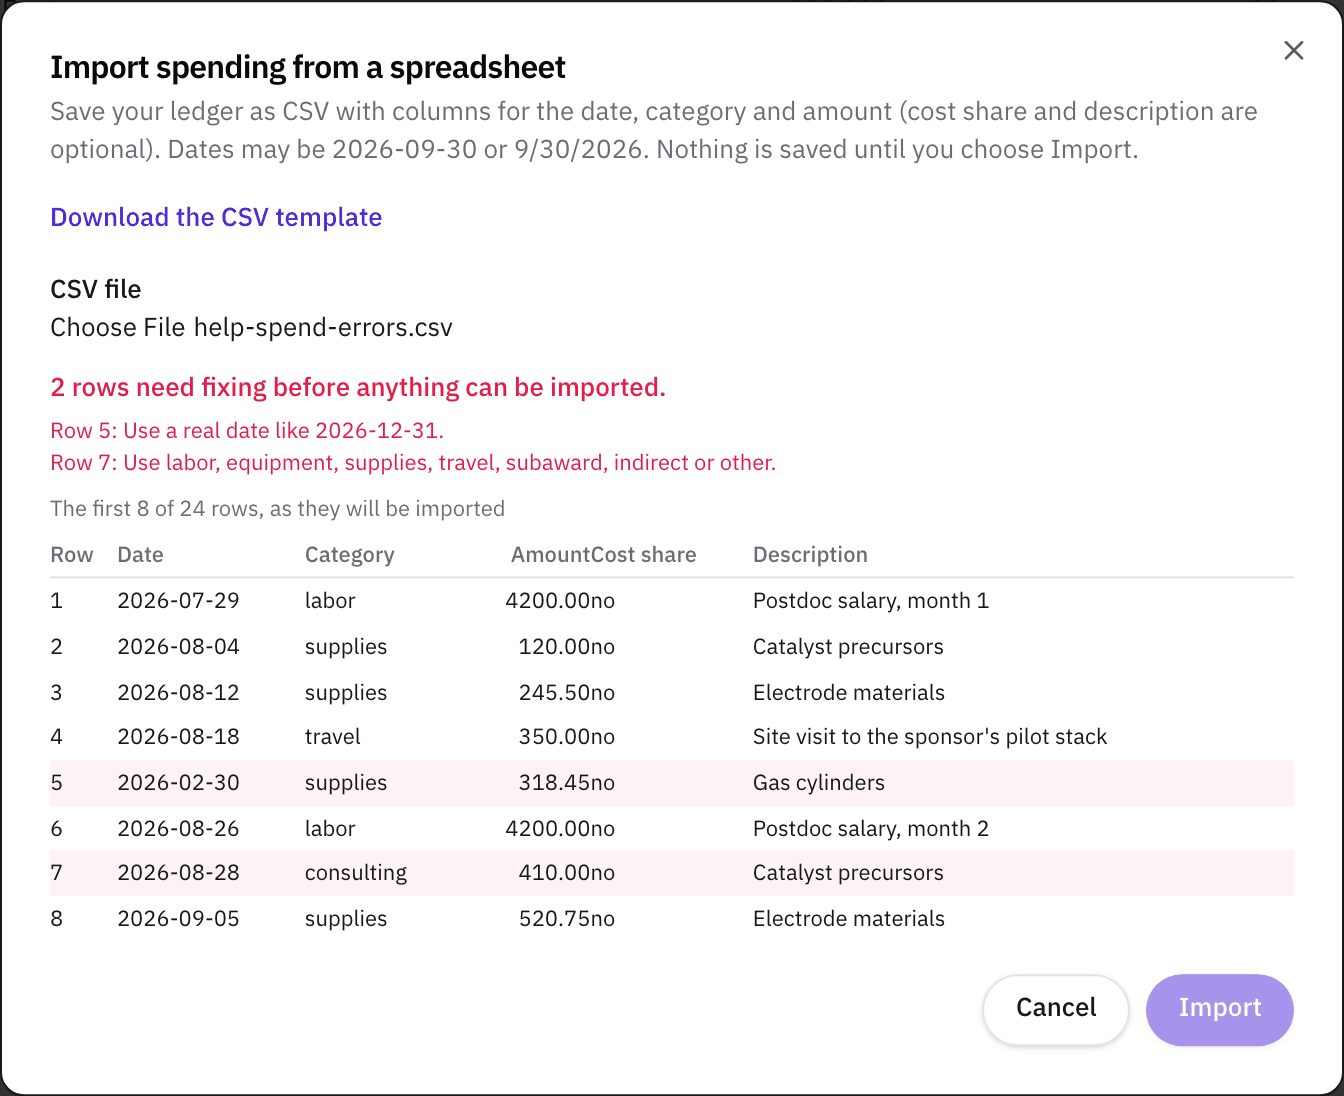
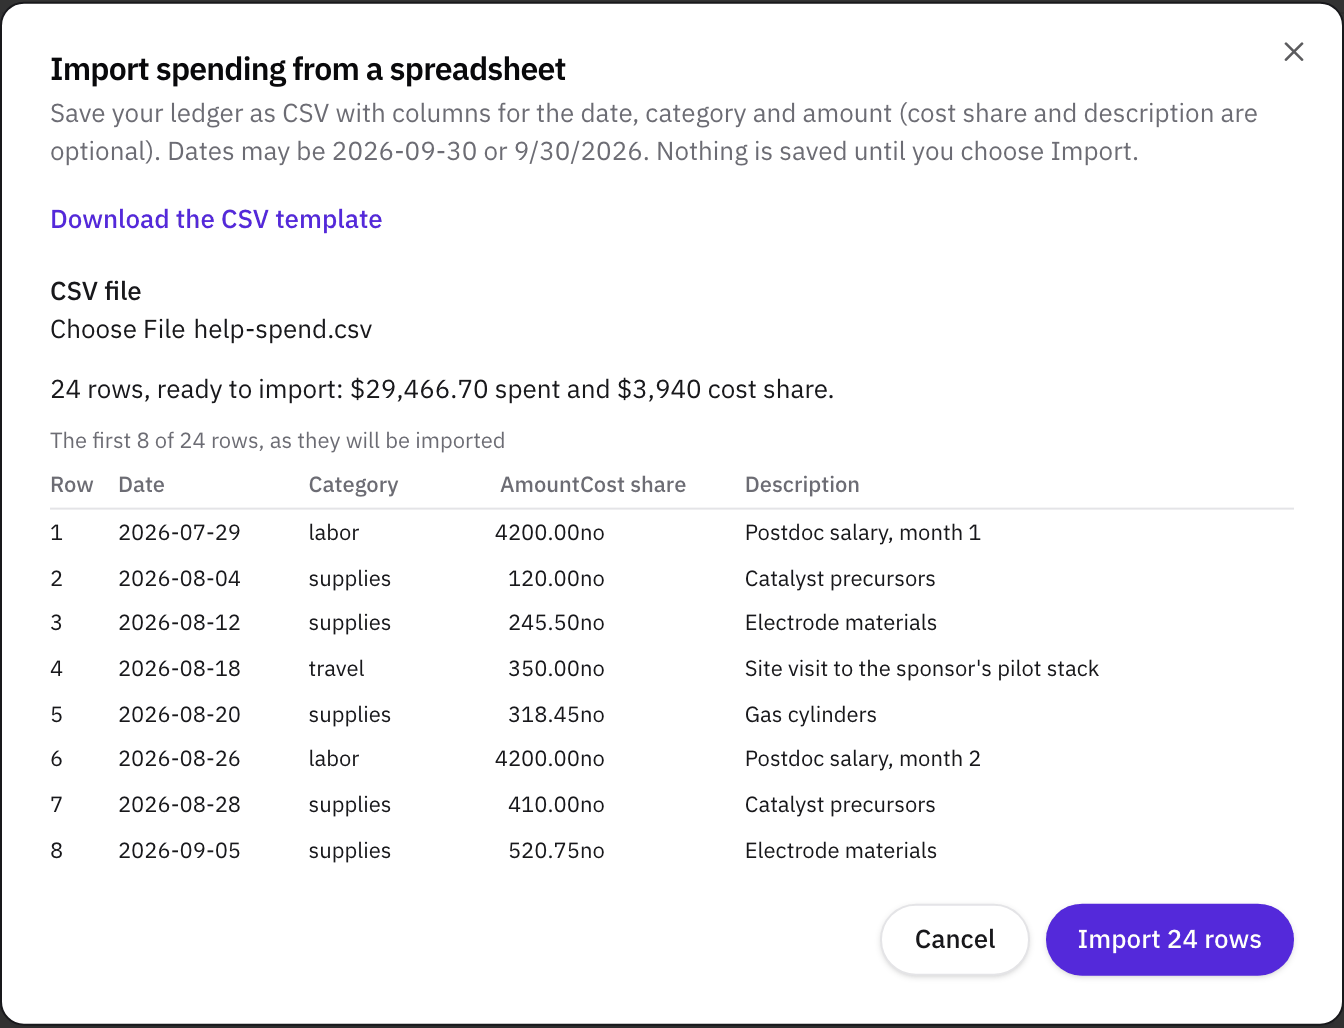
Choose the file under CSV file. Helikon checks every row before anything is saved:
- The preview shows the first 8 rows as they'll be imported.
- If any row has a problem, the dialog says how many rows need fixing and lists each problem by row, such as "Row 5". Fix them in the spreadsheet and choose the file again.
- When every row passes, it says how many rows are ready, with the spending and cost-share totals, and the button reads Import with the number of rows.
The import is all or nothing, so a ledger is never half imported. Each import is listed under Imports, and Undo this import removes all of its entries at once.
Step 6Read the totals
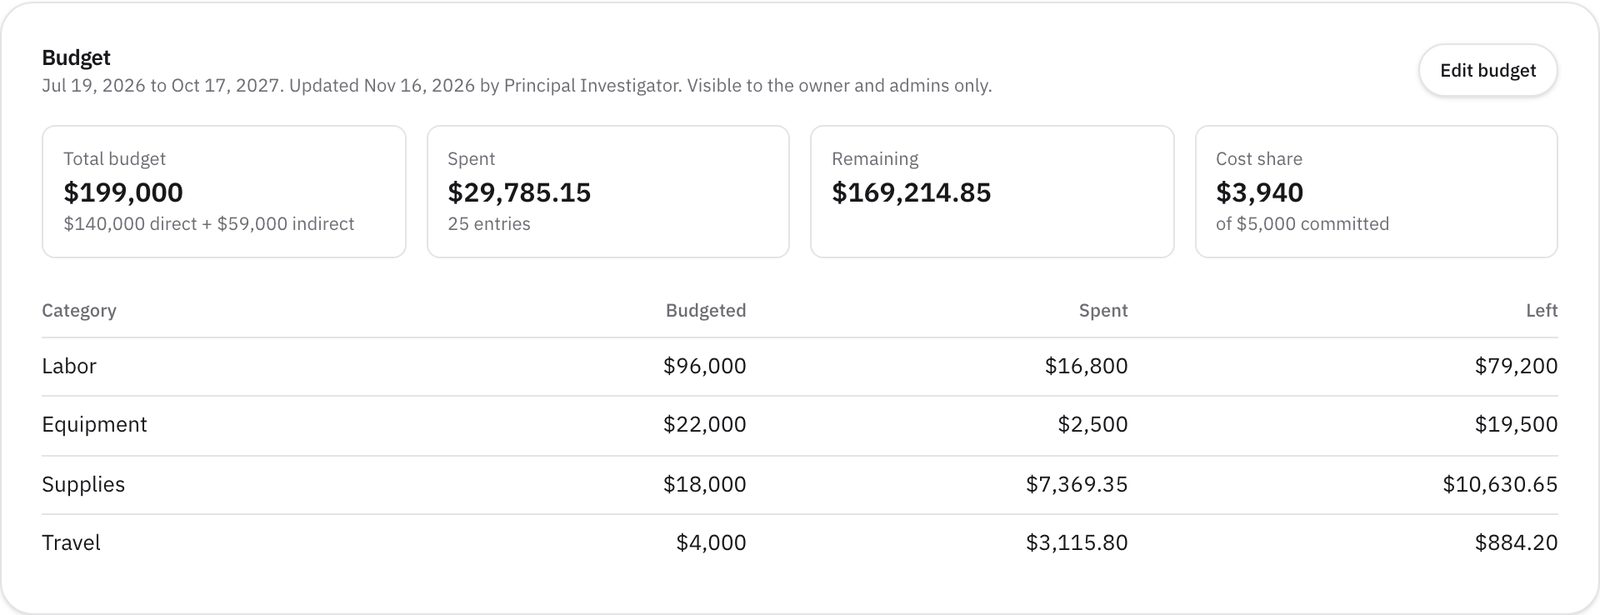
The Budget card shows four figures:
- Total budget: direct plus indirect, with the split underneath.
- Spent: the spending recorded, not counting cost share, with the number of entries.
- Remaining: the total budget minus what's been spent, in red if it drops below zero.
- Cost share: the cost share spent, of the amount committed.
Below them, a table sets Budgeted, Spent, and Left side by side for each Category. The Reports tab's budget quadrant reads the same figures, again for the owner and admins only.
Step 7Decide who sees the figures
Only the project owner and admins see the budget, the spending, and the totals. Everyone else on the project sees Budget: visible to project managers, with a note to ask the owner or an admin for a figure. Saving the budget, importing, and undoing an import each add a line to the Activity tab, with no figures in it, because every member can read that tab.
You can share one figure on purpose. In the budget dialog, Show the total in search and on Discover copies the total to the project's funding amount. Anyone who can see the project can then sort by it with Funding (high to low) on Discover, under Projects. It's off by default and works only for budgets in US dollars.

What to do next
- Track what the budget pays for. How to track deliverables and reporting obligations covers sponsor reports and their reminders.
- Put the payments on the schedule. A payment milestone records what the sponsor pays when it's completed. See How to plan a research project schedule.
- Talk about the rate before you sign. Our article Why do universities charge companies indirect costs, and is the F&A rate negotiable? explains the charge from both sides.
Sources
- Electronic Code of Federal Regulations, 2 CFR 200.306, Cost sharing, paragraphs (a) and (b)(1) (up to date as of 23 October 2026). www.ecfr.gov/current/title-2/subtitle-A/chapter-II/part-200/subpart-D/section-200.306
Related
- GuideHow to manage a university-industry research collaboration: the plain guide
- GlossaryIndirect costs (F&A)
- GlossarySubaward
- GlossarySponsored research agreement (SRA)
- GlossaryPrincipal investigator (PI)
- WalkthroughManage an R&D collaboration project: schedule, obligations, budget, and status reports
- HelpSet up an industry-sponsored project and its contracts
- HelpHow to plan a research project schedule
- HelpHow to track deliverables and reporting obligations
- ArticleWhy do universities charge companies indirect costs, and is the F&A rate negotiable?
- HelpTrack research contracts and grant proposals
- GlossaryAlliance manager
- GlossaryDecision rights
- GlossaryEscalation protocol